
In our daily lives we are inundated with photos. Whether it be on your Twitter stream or posts on Facebook or Instagram. They are everywhere. We include them all the time in our lessons to help students understand the concepts we are teaching. That being said, do we ever slow down to closely analyze the photos? I know I’m guilty of taking a quick glance and thinking that I got the idea and then moving onto the next thing probably missing out on a lot of the details of the image. This became abundantly clear to me when I saw Kelly Gallagher (@KellyGToGo ) present. Kelly ran us through the following exercise to stress that photos need to be read “closely” too.
First, he showed us this image from Joan Steiner:
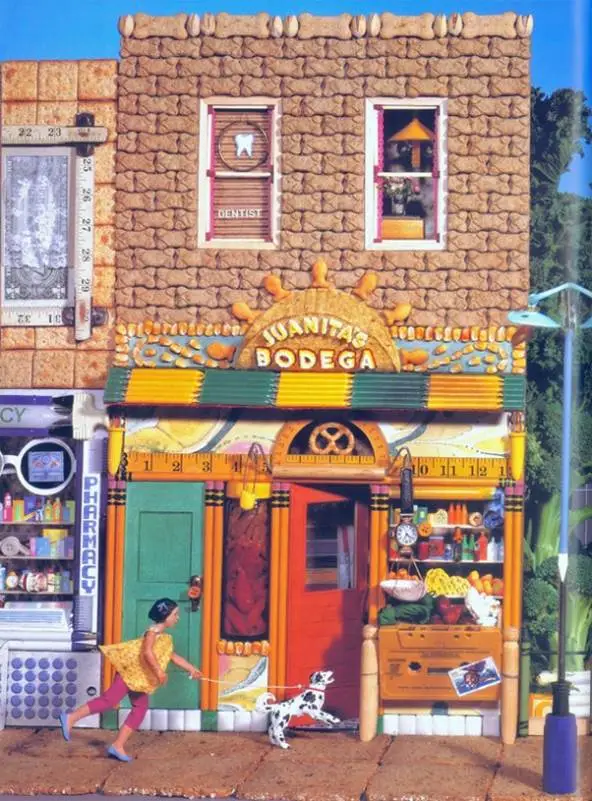
The key is he only showed it to us for about 30 seconds. Then he had us write everything we saw down on our papers. I along with many in the audience wrote that we saw: a girl walking a dog in front of a store. We were in what Kelly referred to as our, “1st draft survival read”. We notice the big items, but missed out on the finer details. He then put the image back up on his screen again and had us take a closer look. He asked us specifically to notice what items made up the image. When he did this a collective, “oooohhhh” came from the audience. We all noticed that the image was made up of other objects such as the side walk is graham crackers, the base of the bodega was Chicklets, the top of the store was mad up of dog bones and Goldfish Crackers, etc… Kelly advised that we need to slow down when we analyze photos and that our students need to be taught to do this too.
I’ve sinced used this activity with my own students to begin teaching the analysis of photographs. It has always worked well and acheived the desired result. I have also used this lesson from Chris Heffernan (@cheffernan75 ) which works in a similar manner. Chris has his students take out a piece of paper and then quickly shows them the following images. (Here are his slides.) He only shows the photos for a few seconds then he asks his students the accompanying questions. Again, because his students are only looking at the images in their “survival read” mode, they miss the finer details and can’t correctly answer his questions. This also works as a great introduction to close reading of photos.
One of the strategies that I’ve found to be most effective is the 4 quadrant method. This is a strategy that Chris also shared with me. In order to do this, you set an image as the background to a Power Point or Google slide. Then you cover up 3/4 of the image using the shape tools. The students again take out a sheet of paper and fold it into 4s. You then have the students note what they see in the image and make inferences about the image in the corresponding quadrant of their folded paper. You could also use this digital organizer too. You continue to uncover the other 3 quadrants, 1 section at a time. Here is a sample that Chris created and was kind enough to share with me. This strategy forces students to slooooowww down and take notice of the objects in the photos. You could also give them these questions to help them with their analysis of photos.
Some other strategies that I’ve used are:
- Place an image as the background of a Padlet and have them annotate the image that way.
- You can have the students place the image as the background of a Thinglink The students then can place hot spots on the image answering the photo analysis questions.
- You can also try this photo analysis organizer.
- Gallery Walk: Display several images about the subject you are studying. Have students place Post-its about reactions, connections, and questions about the photos that are displayed.
- Claim, Evidence, Reasoning: I have also had students make a claim about a photo, give evidence from the photo, and explain their reasoning as to how that evidence supports their claim.
- Real or Fake: Increasingly images are being manipulated and circulated throughout social media. In addition to close reading an image for content, students also will need to be able to assess the credibility of images. I have shown students photos from Hurricane Sandy and asked them if they are real or fake. I used the poll feature on Nearpod after they viewed each image. I used this to start our discussion on image credibility. I used images from this The Atlantic article, “Sorting the Real Sandy Photos From the Fakes”. I followed that activity up with this video clip from Common Sense Education, “How to Use Google Reverse Image Search to Fact Check Images”. Julie Smith (@julnilsmith ) also has a video on how to do this, “Can I De-Bunk this photo in under 2 minutes?”.
- Tableau: Have students pose as the people are in the photo. Then you or their classmates can interview them as they students posing assume the roles of the people in the photograph. (The New York Times Learning Network ( @NYTimesLearning ) has a post describing this here.
Some additional resources for using images are:
The New York Times Learning Network’s (@NYTimesLearning ): “What’s Going On In This Picture?”
The New York Times Learning Network’s (@NYTimesLearning ): “40 Intriguing Photos to Make Students Think”
The New York Times Learning Network’s (@NYTimesLearning ): “How to Teach with Our Picture Prompts and Other Times Images”
The New York Times Learning Network’s (@NYTimesLearning ): Picture Prompts (Accessible, image-driven prompts that invite a variety of kinds of writing.)
The New York Times Learning Network’s (@NYTimesLearning ): “10 Intriguing Photographs to Teach Close Reading and Visual Thinking Skills”
National Geographic’s (@NatGeo ): Photo of the Day
The Library of Congress (@librarycongress ): Analyzing Photographs
& Prints
The TPS-Barat Primary Source Nexus (@PSNTPS ): Analyzing Primary Sources: Learning from Images
What strategies and resources do you use for photos?

Great ideas Ed! For image analysis question prompts plus lots of image analysis strategies, activities & lessons, check out Analyzing Primary Sources: Learning from Images on the Primary Source Nexus.
LikeLike
These are amazing! I knew the Primary Source Nexus had amazing materials for primary sources yet I didn’t know they had so many strategies and resources for analyzing images. I just added the link to my post above. Thanks so much for sharing!
LikeLike